How I Hand Paint Jewellery - Part 3
I’m finishing my series on hand painted jewellery with a look at how I create my Portrait Pendants. Customers who come to my table at arts markets are usually surprised to hear that I hand paint these tiny portraits, making each one unique. Read on to learn about my process.

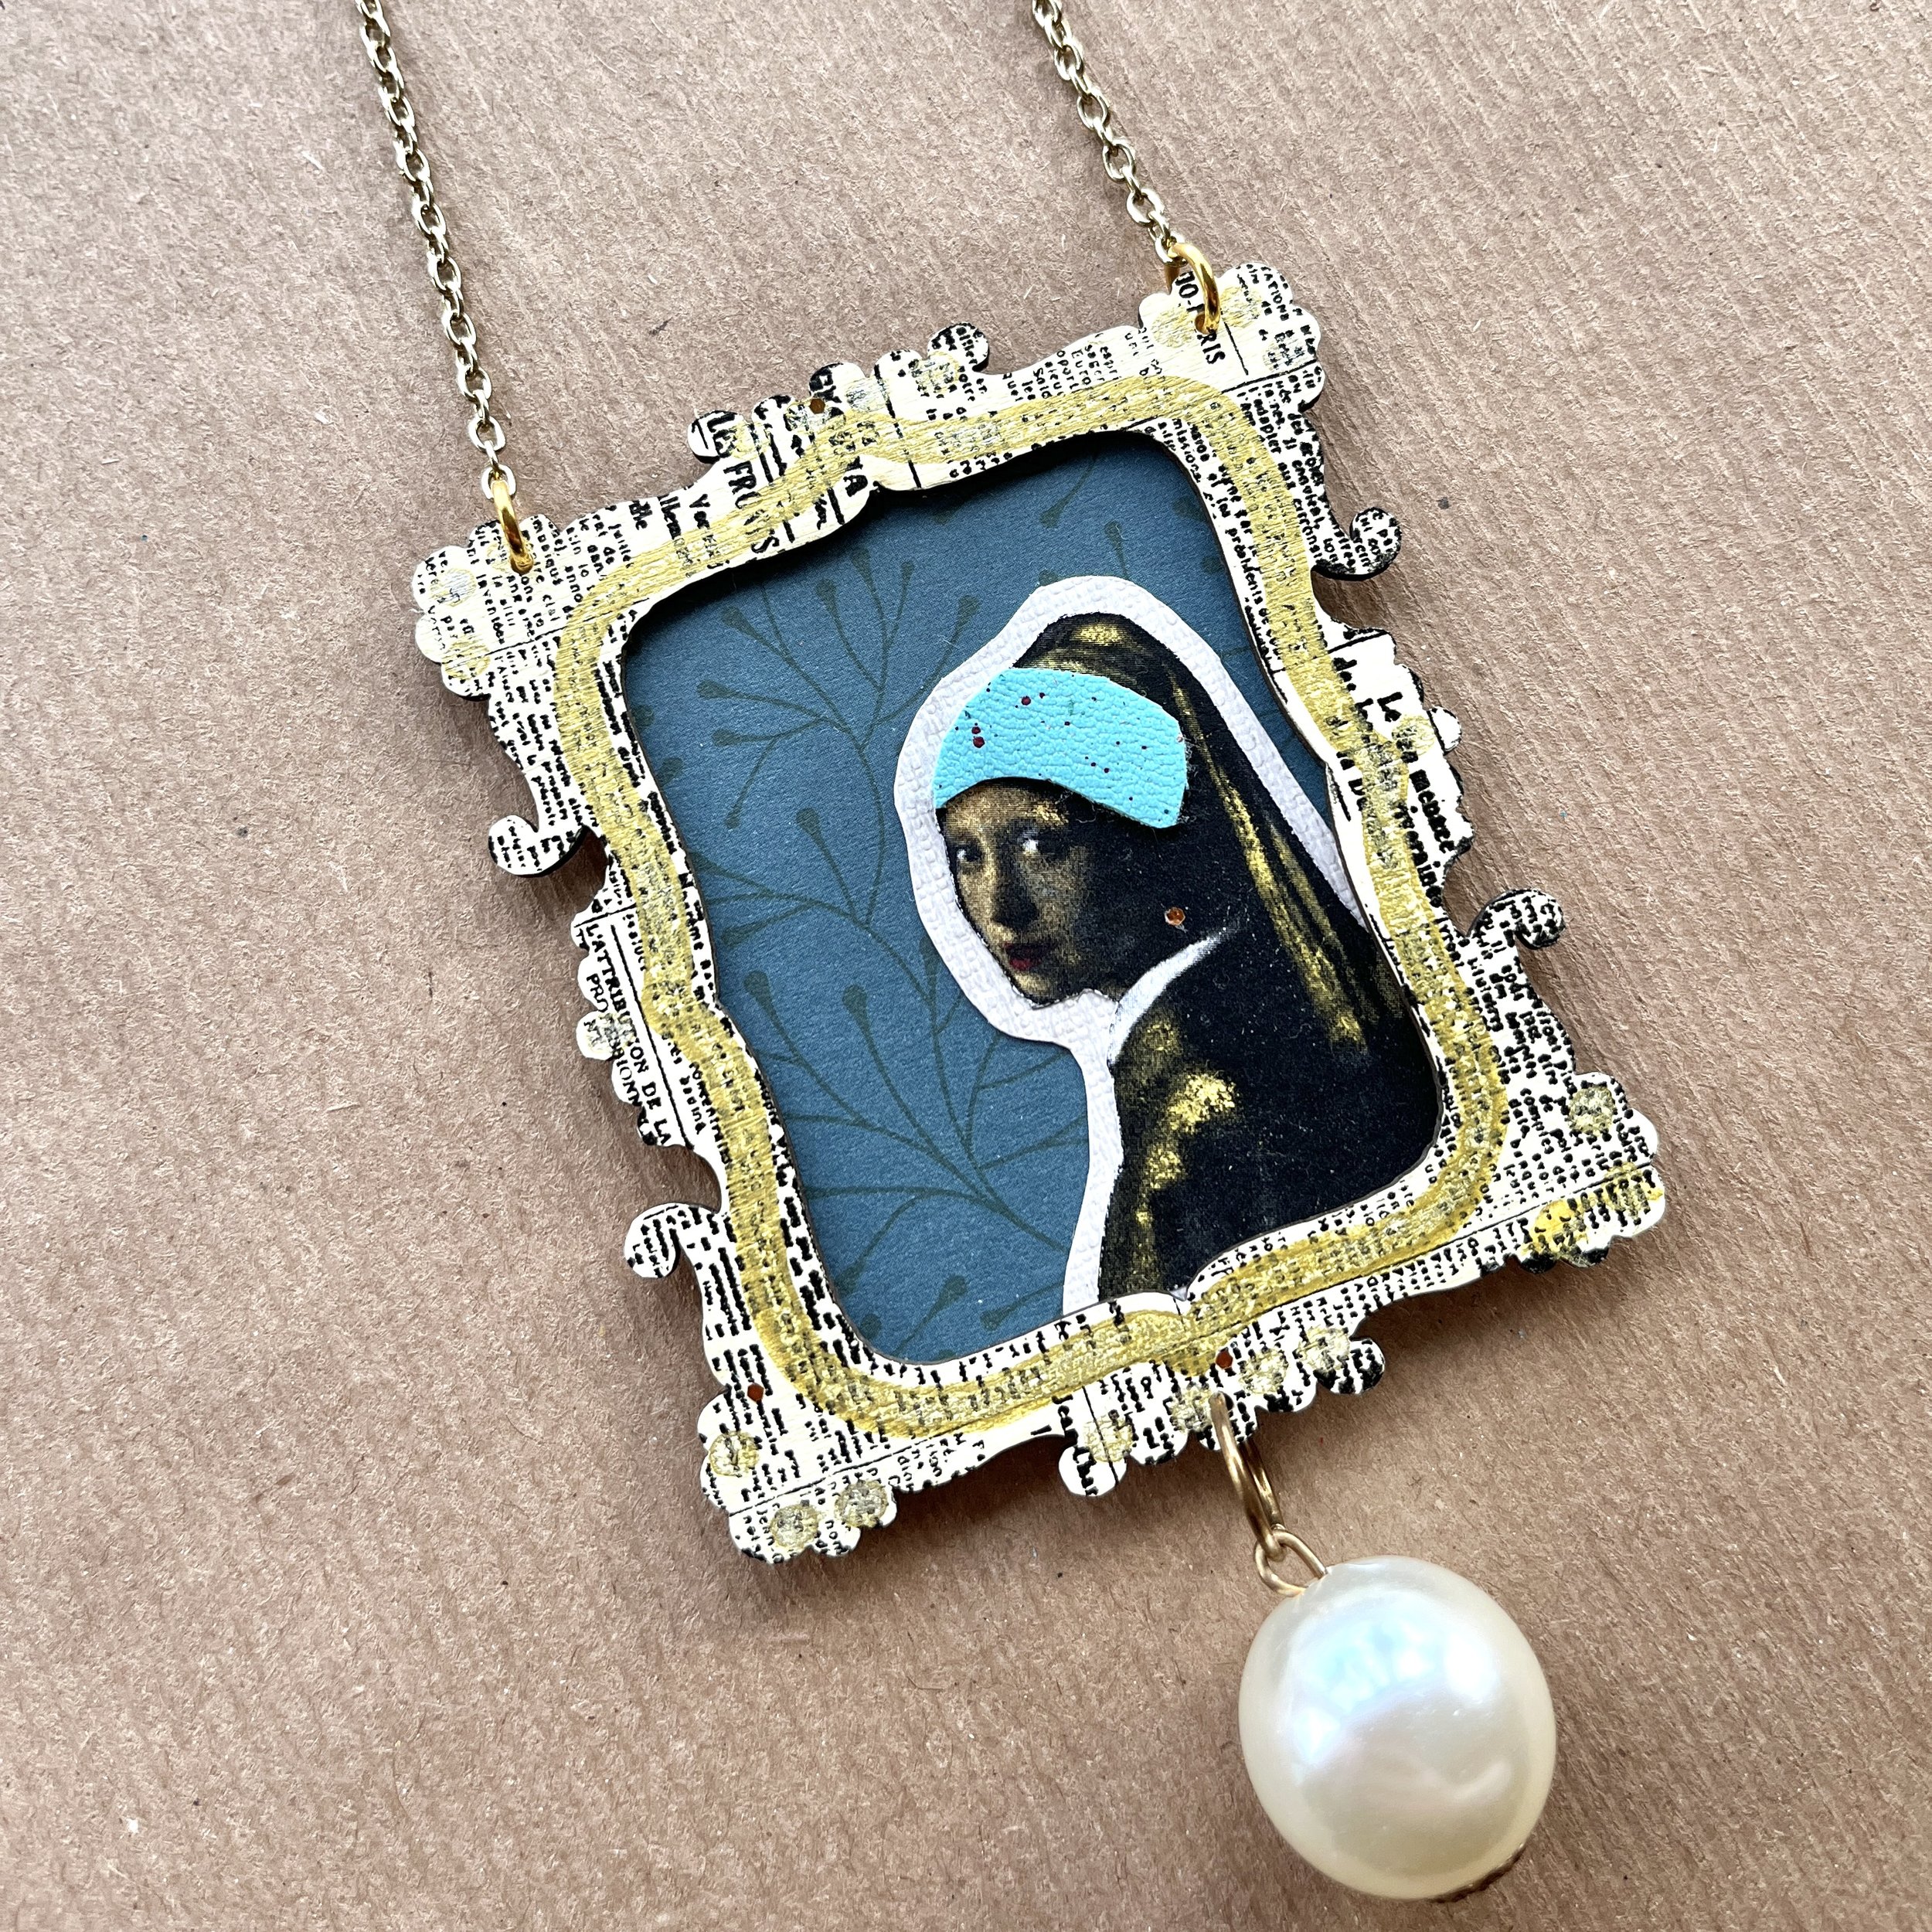
What You Lookin At?
The Girl With A Pearl Earring was the iconic portrait I needed for this project.
Why this portrait?
These necklaces are a bit of a passion project for me as the inspiration for them is firmly rooted in one of my past lives. You see, my degree is in History of Art and I followed it with an MA in Museum Studies. I think I’ll always slightly regret not doing a practical creative degree (I reasoned, perhaps unwisely, that humanities would give me a stronger shot at a career in the arts, if not as an artist but something in museums), but at least what I do now is flexible enough to allow me these little artistic indulgences.
When I had the urge to create a little piece of wearable art, I knew that it needed to be a portrait, and that portrait had to be iconic. Johannes Vermeer’s 1665 painting Girl With A Pearl Earring was the perfect image to recreate in miniature, particularly as her enigmatic gaze back at the viewer forces us to question who she is and what she’s thinking - perhaps the very questions you might have when you see somebody wearing this necklace!
The Inspiration
I made this example piece for a workshop on non-traditional materials.
The Challenge
The original idea for a picture frame necklace came from a studio project where I challenged myself to create necklaces from non-traditional materials like cardboard, paint and haberdashery (read the post here). For that project I used a pre-cut plywood frame designed for journalling and glued it to an image of the Girl that I had collaged with other materials and felt tips. I had so much fun making this necklace that I challenged myself to work it up into a more polished product that involved hand painting rather than collage.
Some way into the process I realised that at least one other laser-cut jewellery company also makes a picture frame necklace. However, their version uses a colour image of a landscape painting, so actually the necklaces are very different to each other and I prefer my approach.
What materials are involved?
I knew that it was unrealistic to try to completely hand paint my version of the Girl. I’m a competent artist, but I’m not a master painter (I’d be a lot richer if I had that sort of talent!), so I decided to use a simple print-out of the original to act as a guide. The portrait is made of simple copier paper with acrylic paint. The frame consists of a plywood base with an acrylic face. I use varnish to give it the appearance of an oil painting. It’s finished with gold plated chain to mimic the hanging chains used in traditional art museums.
1.Preparing the Base.
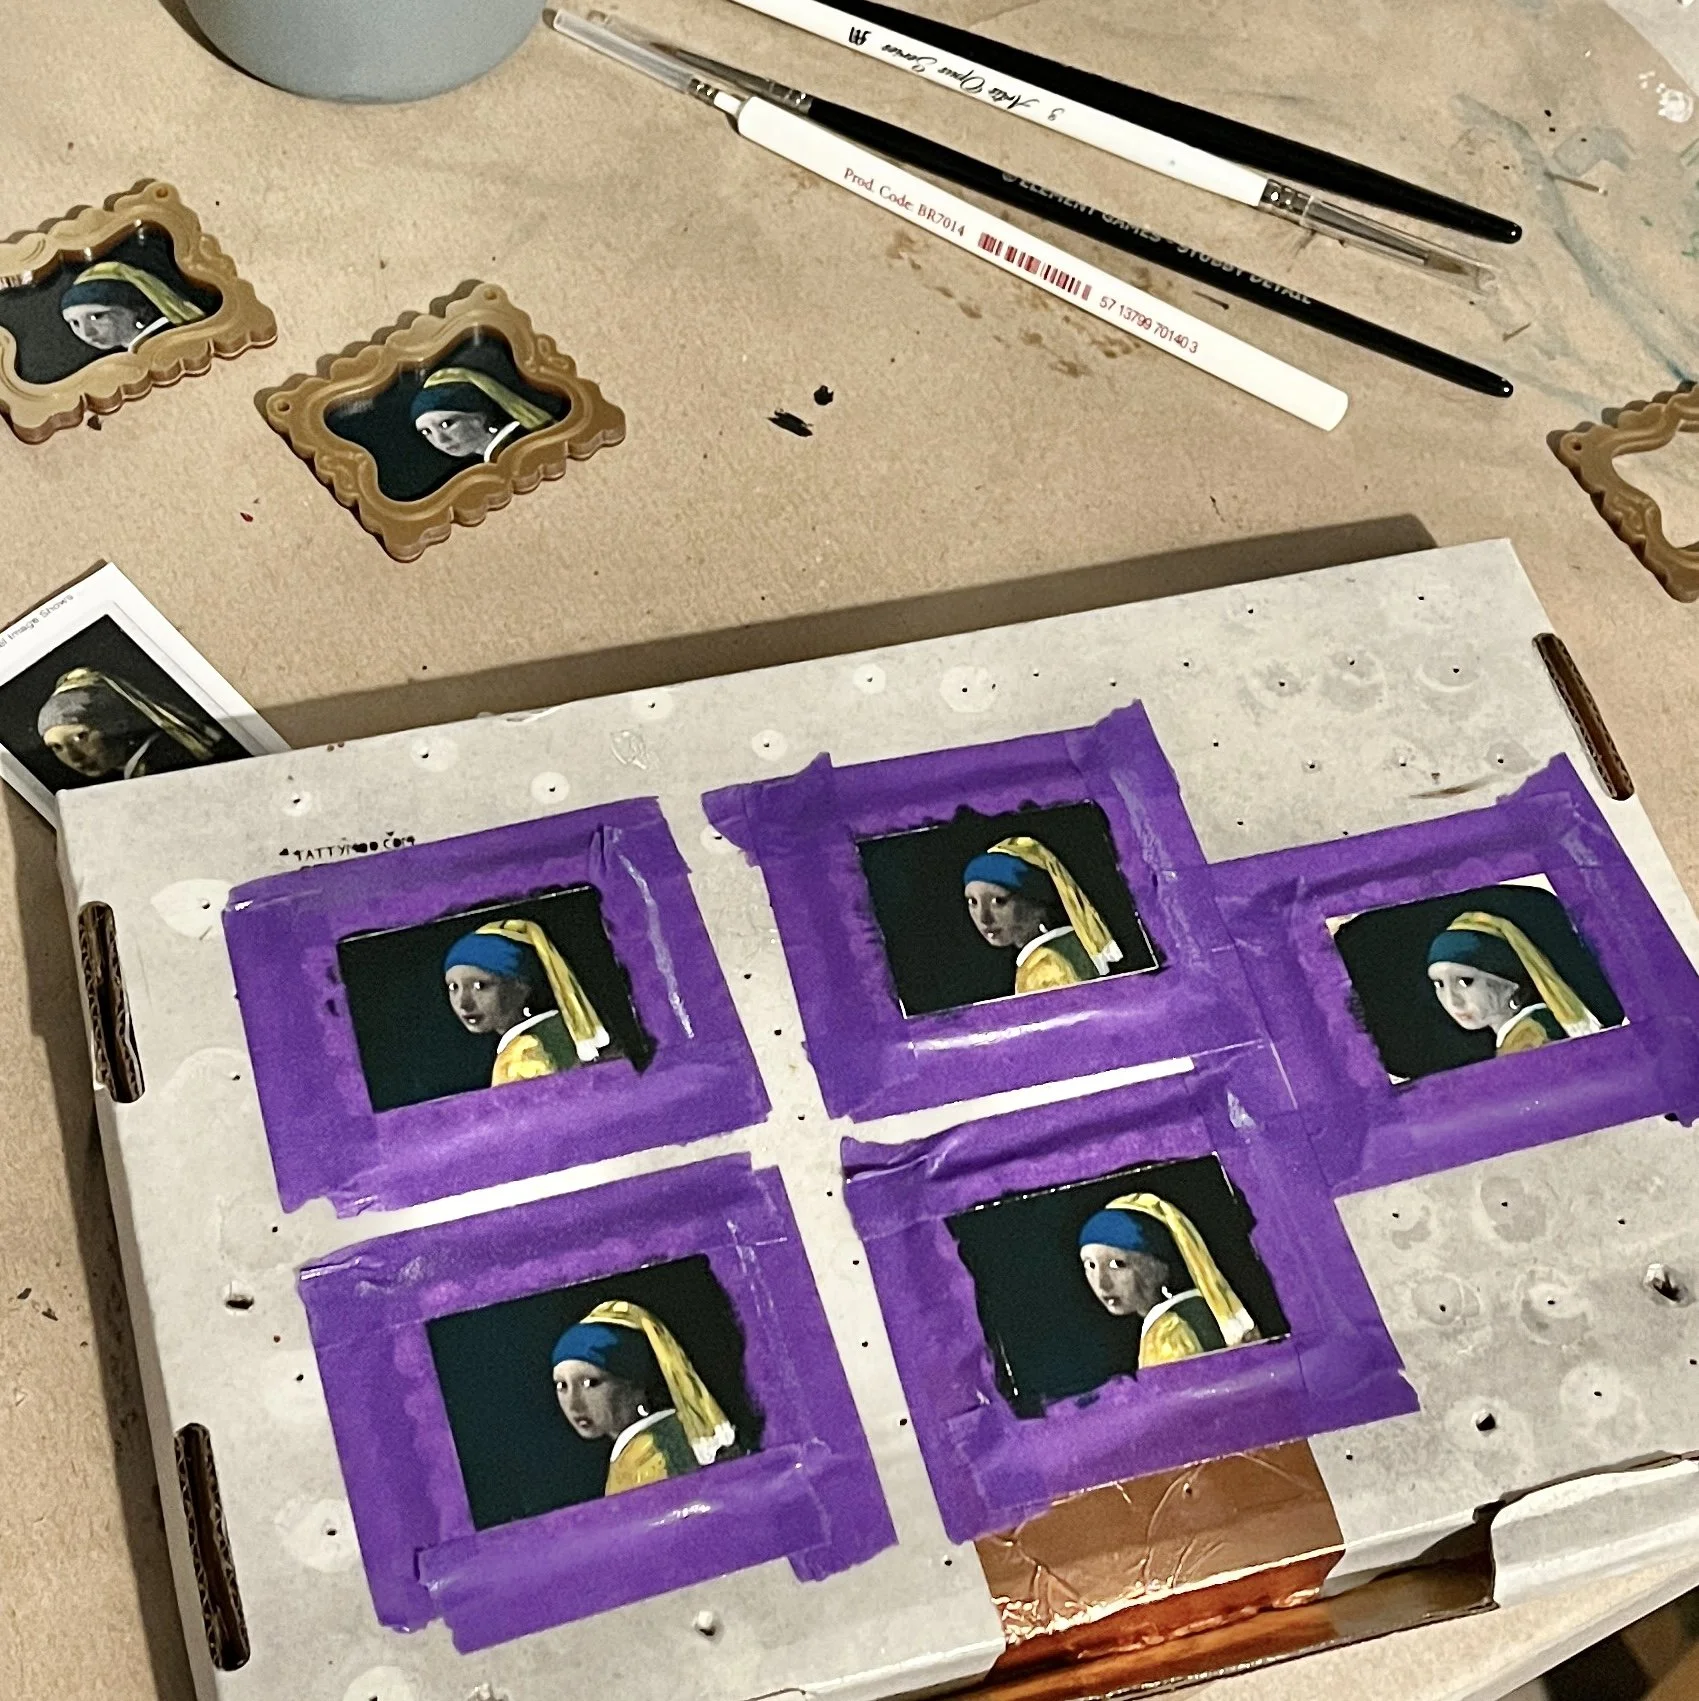
As you’d expect with a piece like this, most of the work involved is in painting the portrait, but first I need to prepare the base. I start with printing out an image of the original painting in black and white on my home office printer using basic copier paper - actually the thinner the better to ensure the frame can be glued together snugly on top of it. It took me a while to find an example of the original online that was the right size when printed (each attempt to resize these images resulted in mis-shaped faces). I cut the image to fit the plywood base and glue it down. Next, I tape the whole thing down to a sheet of thick cardboard (I use broken down delivery boxes as bases in the studio to protect my worktable from paint and glue) and I’m ready to start painting.
Almost There
Painting by hand makes each portrait unique. These have been varnished and I’m about to add the frames.
2.Painting the Portrait.
The painting process is time consuming and requires focus, but because I use acrylic paint the drying time between layers takes only a few minutes. I use acrylic paint and small brushes, referring to an image of the original to guide me. I considered using oil paint, but the fast-drying acrylic paint won me over. The background of the portrait is a very dark blue, which really makes the almost golden head scarf and jacket pop. I decided to use a thinner wash on the face so that the details from the printed image were visible through the paint, and I picked out the eyes and mouth in thicker paint.
3.Fiddly Bits
I don’t need to be too careful when painting the clothes, background and face. As long as the shading is the right colour and the wash on the face isn’t too thick, it works. There are some fiddly bits that require a steadier hand, however. The eyes, mouth and the pearl earring itself are the details that complete the composition, and it’s easy to make mistakes here. The mouth requires a tiny highlight in soft pink to add depth. The pupils need to be in the correct position or she’s looking past your shoulder. The pearl is just a curved highlight in white, a little comma under the suggestion of an ear.
4.Finishing
When the paint is dry, I varnish the portrait, adding a few layers to build up shine to give it the look of an oil painting. After this I glue the frame to the base. I then tape the layers together firmly and leave it to dry for a day. Finally, I add the chain, and the necklace is complete.
Final Thoughts
I wanted these miniatures to resemble real paintings as much as possible within the confines of the medium and I think I’ve achieved that. I’m glad that I chose to hand-paint on top of images of the original artwork, rather than painting without a guide or simply using a coloured print of the original. The results are fairly consistent and more in keeping with the overall design than the alternatives would be. Of course, the frame isn’t carved like an historical frame because laser cutters only cut flat material. I originally planned to use carved doll house frames for a more 3-D look but couldn’t find any in the right dimensions. So, I compromised and designed a filigree style frame and chose metallic acrylic to mimic the gilding often seen on historical frames. Overall I’m happy with how they look and I enjoyed taking on the challenge to create a miniature, wearable piece of art!